|
While these instructions apply to Quicken 2010 and newer, the names and locations of Quicken functions
may vary slightly depending on the version year you
are using.
Please call for assistance if you are trying to learn this
process for the first time.
Setting Funding Information and Generating Checks
On the Checks tab, click
to set which items will be net funded (held back by
the lender). A good strategy is to start by selecting No Net
Funding, then choosing Line By Line to mark which items are
being net funded. You can add in non-HUD-1 checks and other
sources of funding. You can also review the total funding
and net check/wire amounts.
Charges to the same payee will
combine into one check in Quicken. You will see that total
at the top of the list of charges and credits for each payee
and depositor. To prevent charges from combining, you can
change the payee name by adding varying numbers of spaces
before the names.
Enter the exact name your
account in Quicken in the “Quicken Account Name”
field, then click Generate. Quicken will start and the check
information will be sent to a temporary file (C:\Program
Files (x86)\Quicken\checks.qif) for you to import into
Quicken.
Importing Check Information Into Quicken
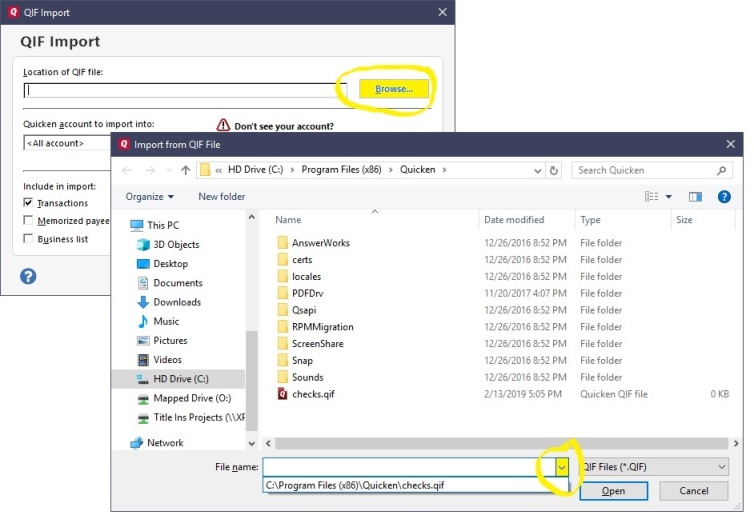
- To import your checks, click the File menu, then Import, and then
QIF File. For “Location of QIF File” browse to C:\Program Files
(x86)\Quicken\checks.qif. (Once you do this the first time, Quicken will
have a record of it. When you click Browse you will be able to click
the down arrow in
the File Name field in the browse window and click on the memorized file
location.) For “Quicken Account to import into,” leave it set to All Accounts. Click OK
to continue.
- When asked “Unrecognized category or class – create category or class?” click Yes.
This adds your closing ID from SC into Quicken as a Category name. The
checks will load into a preview window below the register.
- Important: In the check preview window, make sure
all transactions items are marked “New.” If a transaction is marked
“Matched” it will not be imported unless you select the transaction, right-click it,
and mark it “New.” Click Accept All when finished.
Editing and Printing Checks and the Register Report
- You can edit check entries in the Closing Account check register. To add a check,
scroll to the blank entry at the bottom of the register. To delete, void, copy, or
perform other functions on a check, select the check and, on the Edit menu, click Transaction,
and click the appropriate function. Remove the word Print from any checks you don’t want to
print now, and change deposits to DEP. Items being wired should be set to
EFT.
- To view the actual checks, press Ctrl-W. Select checks to review or change from the list
on the bottom half of the screen. Close the “Write Checks” window to return to the check register.
You can addresses if you wish and build up an Address Book for frequently
used payees.
- To print checks, on the File menu, click Print Checks.
- On the Select Checks to Print screen, enter the first check number of the checks you
will be using. You can print “All Checks,” “Checks Dated Through” or “Selected Checks.”
- Set the type of checks being used (Voucher for checks with vouchers or Standard for three per
page). (Set this permanently by clicking File, then Printer Setup, then For Printing Checks.)
- Click OK to print, and review the printed checks. When asked “Did Check(s) Print OK?” enter
the number of the first check which did not, such as because of a paper
jam (this will reprint the check). Click OK to finish.
- Print a Register Report by clicking the Account Actions (gear) button on
the right above the register (or Ctrl-Shft N). “Register Report” will be
listed about half-way down or on a sub-menu under More Reports.
Click Customize, then the Category tab. In “Category Contains,” enter your SC
File ID (or use the Tags tab to click your SC File Number). On the Display
tab, choose a title and uncheck any columns you don't want. Click OK, then
click the printer icon in the upper left. Close the Report window when finished.
- You can also print the check register itself by clicking the File menu,
then Print <Account Name>, and choosing a date range to print.
|
